How to Write Unmaintainable Code – ASP.NET Redux

No matter how far technology progresses, it seems that we still remain bound to the past by an innate ability of writing poorly structured programs. To me, this points to a rot that is far deeper than languages and platforms. It is a fundamental failure of people who claim to be professionals to understand their tools and the principles that guide their usage.

It has been eight years since I wrote the previous piece in this series that demonstrated poorly written PHP code. The language gets a bad rap due to the malpractices that abound among users of the platform. But this was a theme I was hoping would be left behind after graduating to the .NET framework in the past few years.

It turns out that I was wrong. Bad programmers will write bad code irrespective of the language or platform that is offered to them. And the most shocking bit is that so many of the points from the previous article (and the original by Roedy Green) are still applicable, that it feels like we learned nothing at all.

Reinvent the wheel again. Poorly.

Maintainable code adheres to standards – industry, platform, semantics, or just simply internal to the company. Standard practices make it easy to build, maintain and extend software. As such, they’re anathema to anybody who aims to exclude newcomers from modifying his program.

Therefore, ignore standards.

Take the case of date and time. It is 2018, and people want to and expect to be able to use any software product irrespective of their personal regional settings.

Be merciless in thrashing their expectations. Tailor your product to work exclusively with the regional settings used on your development computer. If you are using the American date format, say you’re paying homage to the original home of the PC. If you’re using British settings, extol upon the semantic benefits of the dd-mm-yy structure over the unintelligible American format.

Modern programming platforms have a dedicated date and time data type precisely to avoid this problem. Sidestep it by transmitting and storing dates as strings in your preferred formats (there doesn’t have to be just one). That way, you also get to scatter a 200-line snippet of code to parse and extract individual fields from the string.

For extra points, close all bug reports about the issue from the test engineers with a “Works for me” comment. Your development computer is the ultimate benchmark for your software. Everybody who wishes to run your program should aspire to replicate the immaculate state of existence of your computer. They have no business running or modifying your program otherwise.

Never acknowledge the presence of alternative universal standards.

Ignorance is bliss

Nobody writes raw C# code if they are going to deploy on the web. A standard deployment of ASP.NET contains significant amounts of framework libraries that enable the web pipeline and extensions to work with popular third-party tools. Frameworks in the ecosystem are a programming language unto themselves, and require training before use.

Skip the books and dive into writing code headfirst.

Write your own code from scratch to do everything from form handling to error logging. Only n00bs use frameworks. Real programmers write their own frameworks to work inside of frameworks. This gives rise to brilliant nuggets such as this.

public class FooController
{
    …
    public new void OnActionExecuting(ActionExecutingContext filterContext)
    {
    }
    …
}

By essentially reinventing the framework, you are the master of your destiny and that of the company that you are working for. Each line of custom-built code that you write to replace the standard library tightens your chokehold on their business, and makes you irreplaceable.

Allow unsanitised input

Protecting from SQL injection is difficult and requires constant vigilance. If everything is open to injection, the maintenance programmer will be bogged under the sheer volume of things to repair and hopefully, either go away or be denied permission to fix it due to lack of meaningful effort estimates.

Mask these shortcomings by only writing client-side validation. That way, the bugs remain hidden until the day some script kiddie uses the contact form on the site to send “; DELETE TABLE Users” to your server.

Try…catch…swallow

Nobody wants to see those ugly-ass “Server Error” pages in the browser. So do the most obvious thing and wrap your code in a try-catch block. But write only one catch handler for the most general exception possible. Then leave it empty.

This becomes doubly difficult to diagnose if you still return something which looks like a meaningful response, but is actually utterly incorrect. For example, if your method is supposed to return a JSON object for the active record, return a mock object from the error handler which looks like the real thing. But populate it with empty or completely random values. Leave some of the values correct to avoid making it too obvious.

Maintenance programmers have no business touching your code if they do not have an innate ken for creating perfect conditions where errors do not occur.

String up performance

Fundamental data types such as strings and numbers are universal. Especially strings. Therefore, store all your data as strings, including obvious numeric entities such as record identifiers.

This strategy has even more potential when working with complex data types containing multiple data fields. Eschew standard schemes such as CSV. Instead come up with your own custom scheme using uncommonly used text characters. The Unicode standard is very vast. I personally recommend using pips from playing cards. The “♥” character is appropriately labelled “Black Heart Suit”, because it lets the maintenance programmer perceive the hatred you bear towards him for attempting to tarnish the pristine beauty of the code you have so lovingly written.

This technique also has a lot of potential in the database. Storing numeric data as strings increases the potential for writing custom parsers or making type-casts mandatory before the data can be used.

Use the global scope

Global variables are one of the fundamental arsenal in the war against maintainable code. Never fail an opportunity to use them.

JavaScript is a prime environment for unleashing them upon the unwary maintenance programmer. Every variable that is not explicitly wrapped up inside a function automatically becomes accessible to all other code being loaded on that page. This is an increasingly rare scenario with modern languages. The closest it can be approximated in C# is to have a global class with several public properties which are referenced directly all over the application. While it looks the same, it is still highly insulated. Try these snippets as an example.

JavaScript –

var a = 0; // Variable a declared in global scope
 
function doFoo() {
    a++; // Modifies the variable in global scope
}
 
function doBar() {
    var a = 1;
    a++; // Modifies the variable in local scope
}

C# –

public class AppGlobals
{
    public int A = 0;
}
 
public class Foo
{
    public void DoSomething()
    {
        // Scope of A is abundantly clear
        AppGlobals.A++;
        var A = 0;
        A++;
    }
}

It is very easy to overlook the scope of the variable in JavaScript if the method is lengthy. Use it to your advantage. Camouflage any attempts to detect the scope correctly by using different conventions across the application. Modify the global variable in some functions. Define and use local variables with the same name in others. Modifying a function must require extensive meditation upon it first. Maintenance programmers must achieve a state of Zen and become one with your code in order to change it.

Use unconventional data types

Libraries often leverage the use of conventions to eliminate the need to write custom code. For example, the Entity Framework can automatically handle table per type conditions if the primary key column in the base class is an identity column.

You can sideline this feature by using string or UUID columns as primary keys. Columns with these data types cannot be marked as identity. This necessitates writing custom code to operate upon the data entities. As you must be aware by now, every extra line of code is invaluable.

Database tables without relationships

If you are working at a small organisation, chances are there is no dedicated database administrator role and developers manage their own database. Take advantage of this lack of oversight and build tables without any relationships or meaningful constraints. Extra points if you can pull it off with no primary keys or indexes.

Combine this with the practice of creating and leaving several unwanted tables with similar names to give rise to a special kind of monstrosity that nobody has the courage to deal with. For still extra marks, perform updates in all the tables, including the dead ones. Fetch it from different tables in different parts of the application. They cannot be called unwanted tables if even one part of your application depends on them. Call it “sharding” if anybody questions your design.

Conclusion

This post is not meant to trigger language wars. Experienced developers have seen bad code written in many languages. Some languages are just more amenable to poor practices than others.

The same principle applies to the .NET framework, which was supposed to be a clean break from the monstrosities of the past. On the web, the ASP.NET framework and its associated libraries are still one of the best environments I have used to build applications.

That people still write badly structured code in spite of all these advances cements my original point – bad programmers write bad code irrespective of the language thrown at them.

A Hash Table using C#

Brian Barto recently put up a post where he described how hash tables are implemented. Many modern programming languages have this data structure as a built-in feature, making it a commonly used item in a developer’s toolkit. Due to its ready availability, few programmers ever have the need to roll their implementation. So it comes as no surprise when people who do not have a formal education in software engineering do not understand how it works. Brian’s post explains the most essential parts of this magical data structure very well.

After reading about it, I felt the urge to implement the same thing in C# as a learning experience. His post carries an implementation using the C programming language, which could be copied over with some tweaking in order to work with the different semantics of C#. This post documents the exercise and its learnings.

The Associative Array

A hash table is an implementation of an associative array, which is a collection of key-value pairs. Each key is unique and can appear only once in the collection. The data structure supports the full range of CRUD operations – create, retrieve, update and delete. All operations are constant time on average or linear time in the worst case, making speed the main advantage of this data structure. In some languages, all operations are rolled into the same operator for simplicity. If the key does not exist, it is added. If the key already exists in the collection, its value is overwritten with the new one. Keys are removed by setting their value to null, or having a separate delete operator for associative arrays.

JavaScript objects are an example of associative arrays.

o[“occupation”] = “Wizard”; // Key created
o[“name”] = “Jane Doe”; // Key updated
console.log(o[“name”]); // Value retrieval
delete o[“occupation”]; // Jane just retired

A hash table uses a linear array internally to store values. The key is converted into an integer by running it through a hash function, which is then used as the index into the backing array where the value is stored. A good hash function has two characteristics – minimal conflicts and uniform distribution.

Minimal Conflicts

As explained above, a hash function works by converting an input into an integer. A modular hash function is one of the simplest implementations possible, which returns the remainder of a division (aka modulo) of the key by the table length.

int size = 100;
int key = 10;
int index = key % size; // 10

However, this function can end up with a high number of conflicts. The remainder of dividing 10, 110, 210 and so on are are all 10, and require additional steps to resolve the conflict. This condition is minimised by setting the length of the array to a prime number.

int size = 97;
int key = 10;
int index = key % size; // 10
key = 110;
index = key % size; // 13
key = 210;
index = key % size; // 16

Uniform Distribution

Discrete uniform distribution is a statistical term for a condition where all values in a finite set all have an equal probability of being observed. A uniform distribution of hash values over the indexes into an array reduces the possibilities of key conflict, and reduces the cost of frequent conflict resolution. Uniform distribution over an arbitrary set of keys is a difficult mathematical challenge, and I won’t even pretend to understand what I’m talking about. Let it just suffice that a lot of really smart folks have already worked on that and we get to build upon their achievements.

If the keys in a hash table belong to a known and finite set (such as a language dictionary), then the developer can write what is known as a perfect hash function that provides an even distribution of hashes with zero conflicts.

Resolving Conflicts

Finally, general purpose hash functions can often result in conflicts, i.e. return the same output for two separate inputs. In this case, the hash table must resolve the conflict. For example, the modular hash function returns the index 13 for the key 13 as well as 110. There must be a way to set both these keys simultaneously in the same collection. Broadly, there are three techniques to achieve this.

Separate Chaining

In this technique, the values themselves are not stored in the array. They are stored in a separate data structure such as a linked list, and a pointer or reference to that list is stored in the backing array. When a value is to be located, the function first computes its index by hashing the key, then walks through the list associated with that index until it finds the desired key-value pair.

Open Addressing

Open addressing stores all records in the array itself. When a new value is to be inserted, its index position is computed by applying the hash function on the key. If the desired position is occupied, then the rest of the positions are probed. There are several probing algorithms also. Linear probing, the simplest of them, requires walking the array in fixed increments from the desired index until an empty spot is found in the array.

Implementation

Enough theory. Let us move on to implementation details.

The first step is to define a HashTable class. The size of the hash table is restricted to 100 entries for this exercise and a fixed-length array is initialised to store these entries.

public class HashTable
{
    private static readonly int SIZE = 100;
    private object[] _entries = new object[SIZE];
}

This is where the implementation of this data structure veers away from the one shown in Brian Barto’s post. The original post used explicitly named method for insert, search and delete operations. However, C# allows the nicer and more intuitive use of a square-bracket syntax to perform these same operations.

public class HashTable
{
    ...

    public int this[int key]
    {
        get;
        set;
    }
}

The client program uses the following syntax to consume this interface, which is much more concise than having separate methods for each operation.

HashTable map = new HashTable();
map[key] = value; // Insert
int value = map[key]; Retrieve
map[key] = null; // Delete

The HashTable class internally uses a struct called Entry to store individual key-value pairs.

struct Entry
{
    internal int key;
    internal int? value;
}

The type of the value field in the Entry struct must be set to a nullable int so that the client can set it to null when the value has to be cleared. The declaration of the _entries field is changed as follows.

private Entry?[] _entries = new Entry?[HashTable.SIZE];

Finally, we come to the meat and potatoes of this exercise – the accessor & mutator functions, whose signature is also modified to support the nullable type.

public int? this[int key]
{
    get
    {
        ...
    }

    set
    {
        ...
    }
}

The code for these methods and the hash function is more or less identical to the one described in Brian’s post, with some tweaks to accommodate for the nullable value.

get
{
    int index = _hash(key);
    
    while (null != _entries[index])
    {
        if (key == _entries[index]?.key)
        {
            break;
        }
        index = (index + 1) % HashTable.SIZE;
    } 
    return _entries[index]?.value;
}

set
{
    if (null == value)
    {
        Delete(key);
    }
    else
    {
        int index = _hash(key);
        while (null != _entries[index])
        {
            if (key == _entries[index]?.key)
            {
                break;
            }
            index = (index + 1) % HashTable.SIZE;
        }

        _entries[index] = new HashEntry { key = key, value = value };
     }
}

The one additional member in this class is the private Delete method which is required to delete the entry. This method is called by the mutator function when the client passes in a null value.

private void Delete(int key)
{
    int index = _hash(key);

    while (null != _entries[index])
    {
        if (key == _entries[index]?.key)
        {
            break;
        }
        else
        {
            index = (index + 1) % HashTable.SIZE;
        }
    }

    if (null == _entries[index])
    {
        return;
    }

    _entries[index] = null;
}

That’s all that’s needed to implement this data structure. The hash function shown in this example is a very na├»ve implementation. The probability of collisions is very high and the probing function is very slow. It also cannot work with any data type other than int for both keys and their values.

In spite of these limitations, this still made for a very useful learning exercise.

A Model for Sequential Workflow Execution

Many features like automatic memory management have made modern programming technically easier. But pesky business requirements still remain a formidable challenge. A large portion of the complexity in modern applications originates from ever-evolving business rules. In an ideal scenario, there would be no functional requirements and programmers would be paid directly in Cheetos and Mountain Dew for doing cool stuff all day. Unfortunately, that’s not the case, and all payments must be made in fiat currency rather than snacks. So a business is necessary in order to generate revenue. And with it come its own requirements for things like processes, regulations and laws.

In spite of this, a smart programmer can notice that the application of rules to a process is easily separated from the rules themselves. They can be applied in linear sequence or driven by outcomes of its component steps (such as offering the customer a choice between cash discounts or adding complimentary products instead). Linear processing is straightforward to implement – execute each step in a queue one at a time until they are all done. Conditional processing depends on the outcome of the previous step, making the workflow a gigantic mishmash of if-else statements if not handled carefully from the start.

Both types of processing can incorporate structures such as loops, sub-routines and interrupts.

This post demonstrates an implementation of a sequential workflow where the process pipeline is separated from the steps in the process. This architecture allows for the execution of the pipeline to remain unchanged even if the steps in the process change.

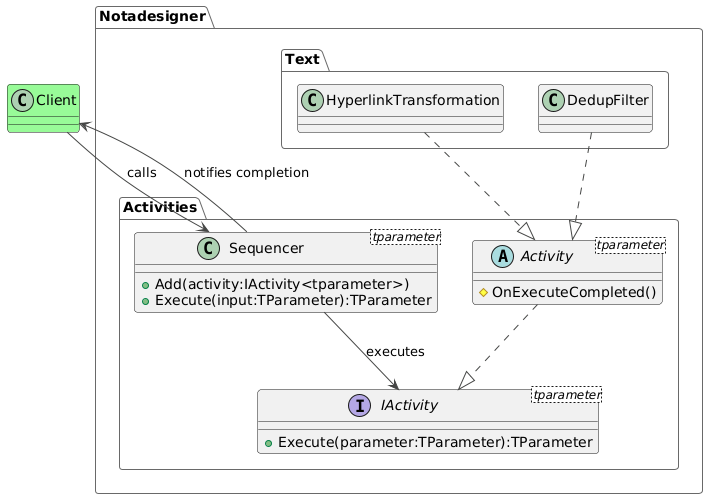
The workflow model constitutes of the entities described below.

PlantUML Syntax:<br />
!theme vibrant<br />
interface Notadesigner.Activities.IActivity<tparameter> {<br />
+Execute(parameter:TParameter):TParameter<br />
}</p>
<p>class Notadesigner.Activities.Sequencer<tparameter> {<br />
+Add(activity:IActivity<tparameter>)<br />
+Execute(input:TParameter):TParameter<br />
}</p>
<p>abstract class Notadesigner.Activities.Activity<tparameter> {<br />
# OnExecuteCompleted()<br />
}</p>
<p>class Client #palegreen</p>
<p>Notadesigner.Activities.Activity ..|> Notadesigner.Activities.IActivity<br />
Notadesigner.Activities.Sequencer –> Notadesigner.Activities.IActivity : executes<br />
Notadesigner.Text.HyperlinkTransformation ..|> Notadesigner.Activities.Activity<br />
Notadesigner.Text.DedupFilter ..|> Notadesigner.Activities.Activity</p>
<p>Client -down-> Notadesigner.Activities.Sequencer : calls<br />
Notadesigner.Activities.Sequencer -up-> Client : notifies completion<br />

Activities are the steps which must be performed in a workflow. The type IActivity<TParameter> defines the common minimum standard that all activities must implement. It requires a method called Execute which takes one parameter.

void Execute(TParameter parameter)

The parameter is the input that this activity may require. Its type should match the type specified in the concrete constructor of this interface. Consuming the Sequence class is easy if this is a reference type. The client simply has to call its Execute method and wait for it to return. The modifications will show up in the input instance that the client already has. But if it is a value type, the the caller has to subscribe for the ExecuteCompleted event from the Sequence, whose handler receives the modified value as a parameter.

The IActivity<TParameter> type exposes an ExecuteCompleted event. The Sequencer must subscribe to this event in order to be notified when the activity completes its execution successfully. The event delegate receives a parameter of type ExecuteCompletedEventArgs. The Result property of this instance contains the modified value of the input.

Activity<TParameter> is an abstract class that provides a minimal implementation of the IActivity interface. Derived classes which override the Execute method must ensure that the method in the base class is called, or otherwise ensure that the OnExecuteCompleted method is called when the method completes successfully.

Sequence<TParameter> is the primary execution path of the workflow. It lets the client add activities to the workflow and execute them in the order that they were added.

The Sequence class stores the activity class instances in a queue. It uses an enumerator to ratchet through the list. The enumerator points to the first activity instance and executes it. The Sequence class subscribes to the ExecuteCompleted event from the Activity instance, which causes the enumerator to move to the next activity in the list and execute it. This process continues until all the activities in the list have been executed. At this point, the Sequence itself dispatches the ExecuteCompleted event, which the client must subscribe to.

The Sequence class exposes the following methods.

void Add(IActivity<TParameter> activity)

This method accepts an IActivity instance, whose generic parameter must match the generic type of the Sequence class instance itself.

public void Execute(TParameter input)

This method triggers the execution of the Sequence. It takes a single parameter of the type declared in TParameter. This input is passed as a parameter to the Execute method of all the Activity instances in the sequence.

Activities are further classified into filters and transformations. A filter scans the input and either allows or disallows further processing. It does not modify the input in any manner. A transformation activity modifies the input in some way and returns the modified value as output. In the case of the former, there needs to be a mechanism to signal a break in the process to the client. For this, the activity must throw a ExecuteException. The client of the Sequence class must wrap the call to the Execute method in a try block and handle any failure to complete the process in the catch block.

These types are collectively sufficient to provide the framework for any simple linear workflow. However, the actual steps to be performed are not part of the framework. The client must provide the concrete implementations of the Activity class, one for each step in the process. These classes are instantiated and added to the Sequence class.

Examples

The following section demonstrates how a transformation and a filter can be implemented and consumed by this framework.

Classes which derive from Activity are part of the client implementation and must be stored in the client namespace. In this example we use the Notadesigner.Text namespace to implement a HyperlinkTransformation and a DeDupFilter.

HyperlinkTransformation scans the input string for any sequences that begin with http:// or https:// and wraps it within an anchor tag. This example uses a very simple RegEx sequence to perform this step. We are not really interested in the versatility of the regex for this throwaway example.

public class HyperlinkTransformation : Activity<string>
{
    void Execute(string input)
    {
        RegEx.Replace(input, @"http(s)?://[a-z.]+");
        base.Execute(input);
    }
}

…
var activity = new HyperlinkTransformation();
activity.ExecuteCompleted += (sender, e)
{
    Console.WriteLine{"Result {0}", e.Result);
};
activity.Execute("Visit http://www.notadesigner.com for best deals in programming snippets.");
…

When the Execute method completes, it dispatches the ExecuteCompleted event.

DeDupFilter compares the string with existing values in the database. If it is a duplicate, then the previous string is maintained as is and the new one is discarded. This is achieved by throwing a SequenceException from the Execute method of this class if an existing match is found.

public class DeDupFilter : Activity<string>
{
    void Execute(string input)
    {
        // CurrentEntries is of type List<string> and is populated previously with string entries
        if (CurrentEntries.IndexOf(input) > -1)
        {
            throw new ExecuteException("Entry already exists");
        }
    }
}

…
try
{
    var activity = new DeDupFilter();
    activity.Execute("Talk is cheap. Show me the code.");
}
catch (SequenceException)
{
    Trace.TraceError("Entry already exists");
}
…

The client can then handle the exception and proceed with the understanding the input being inserted was already present in the database.

Adding Some Life

The previous installment in the Building FitNet series explained how to connect a view-model with a view, using a modular and extensible architecture. In this episode, I explain how interactivity can be added to the user interface.

The simplest interactive UI control is a button. You click on it, and it executes some action. Buttons in Windows Forms worked the same way. But WPF takes the button and turns the knob up to 11. Buttons in WPF can take on literally any appearance that you can dream of. Building the user interface using XAML is already so much better than using the Designer or literal code statements. Features such as data binding are added bonus and allow for more dynamism in the user interface. You can bind the appearance of a Button instance to a view-model that reacts to the state of the application and literally make things dance.

The change in architecture also extends to the use of the event handlers. The built-in System.Windows.Controls.Button class has a property called Command, which can be bound to the view-model of the instance. The Command property is of type System.Windows.Input.ICommand. Any class that implements this interface can be attached to this property.

This sounds a bit counterintuitive at first. Why have a special type, when a simple function can suffice?

And the answer is separation of concerns. A command decouples the object that invokes the command from the object that executes the command.

The ICommand interface also provides additional properties that make it easy to control the state of the button with a bit of additional code.

public class RelayCommand : ICommand
{
    public RelayCommand(Action execute, Func<bool> canExecute)
    {
        …
        _execute = execute;
        _canExecute = canExecute;
    }
 
    event EventHandler ICommand.CanExecuteChanged
    {
        // Event dispatched event when the state of the CanExecute property changes
        …
    }
 
    bool ICommand.CanExecute(object parameter)
     {
         return null == _canExecute ? true : _canExecute();
     }
 
    void ICommand.Execute(object parameter)
     {
         _execute();
     }
}

The Command property of the button is assigned an instance of RelayCommand. This class constructor takes two parameters – an Action delegate called execute and a Func<bool> delegate called canExecute. The Action is called when the command is to be executed, whereas the Func<bool> determines if the command can be executed at all or not.

This is useful for performing runtime checks on the validity of input. The CanExecute delegate is triggered automatically by the framework periodically, which keeps the state of the button updated at all times.

The Command object should be made available through the view-model so that the button can be bound to it.

public class CalculatorViewModel
{
    public CalculatorViewModel()
    {
        TryCalculateCommand = new RelayCommand(TryCalcuate, CanTryCalculate);
    }
 
    public ICommand TryCalculateCommand
     {
         get;
         private set;
     }
 
    private void TryCalcuate()
    {
    }
 
    private bool CanTryCalculate()
     {
         // Validate the input fields and return a boolean
     }
}

That’s it! All that’s left is to bind the Command property of the Button instance to the TryCalculateCommand property in the view-model.

<Button Content="Calculate" Command="{Binding TryCalculateCommand}"/>

Collectively, these minor improvements in paradigm make WPF a much nicer framework to use over its predecessors.

In With the New

It turns out that there is a much better way to manipulate the user interface in WPF which is based on view-models. I cover this aspect in this episode of Building FitNet.

The System.Windows.Application class is the core of a WPF program. An instance of this class remains in memory for as long as the application is running. In order for the application to do something useful, programmers must extend this class and customise its behaviour to the needs of their own application. By convention, the primary application window is also instantiated by this class in the OnStartup event handler.

private ShellViewModel _shellViewModel;

override public void OnStartup(StartupEventArgs e)
{
  base.OnStartup(e);
  _shellViewModel = new ShellViewModel();

  var window = new Shell();
  window.DataContext = _shellViewModel;
  window.Show();
}

An instance of the ShellViewModel class is assigned as the view-model for the application window through its DataContext property. When the properties in the view-model instance change, it dispatches a PropertyChanged event along with the name of the changed property. Corresponding event handlers in the window object then query the view-model for the new state and update the appearance of the display. The ShellViewModel class must implement the System.ComponentModel.INotifyPropertyChanged interface for this behaviour.

The following example illustrates this by changing the title of the application window.

public class ShellViewModel
{
  …
  public string Title
  {
   get
   {
     return _title;
   }

   set
   {
      _title = value;
     var e = new PropertyChangedEventArgs("Title");
     PropertyChanged(this, e);
    }
  }
}

Specific properties of the view are bound to their corresponding counterparts in the view-model. In this example, the Title property of the Window class is bound to its namesake in the view-model.

<Window … Title="{Binding Path=Title}">
  …
</Window>

Therefore, when the title changes on the view-model, the change gets reflected on the view. The key here is assigning an instance of the ShellViewModel to the DataContext property, which establishes the bindings between the view and the view-model.

This concept is key to understanding and implementing properly architected WPF applications.

Binding On-Screen Views

This concept of binding a view to data can be extended to any type. Primitive types are rendered as strings. For complex types, programmers can build composite views made up of several different fundamental UI elements such as labels, text fields and buttons. Properties in the view-model are bound to these controls.

In order to render the content in the window, the application must instantiate ContentControl, which is shipped along with WPF. This class has a property called Content, which can be bound to any property in the view-model.

<ContentControl Content="{Binding Title}"/>

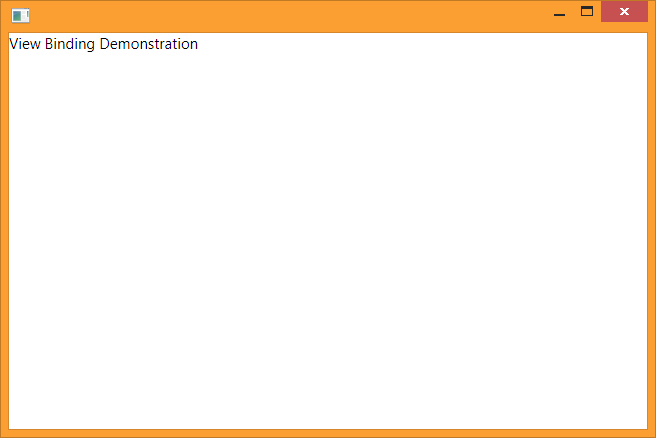
The output of the program written so far is shown below.

A string binding between a view-model and a view

When the value of Title in the view-model changes, the text rendered inside the ContentControl instance is updated to reflect the new text.

Building Compound User Interfaces

The third part of the equation is assigning a data template to the view, which describes the visual structure of an object. A data template is a window resource.

<Window…>
  <Window.Resources>
    <DataTemplate DataType="{Type system:String}">
      <TextBlock Text="{Binding StringFormat={}The application name is &#x2014; {0}}"/>
    <DataTemplate>
  </Window.Resources>
  …
</Window>

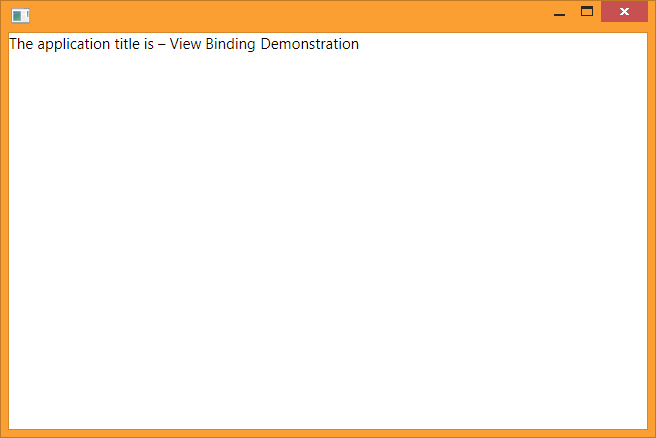
This modifies the appearance of the ContentControl instance. Instead of rendering plain text with just the name of the application, the output is decorated with some additional text and special characters, and looks like this.

An annotated string binding between a view-model and a view

The Big Picture

Essentially, the outcome of what appears on the screen is now split into three classes – a view-model, a view, and a data template that specifies which determines which view to use to render a view-model.

It’s a small step from here to building complete user interfaces using this style of programming.

This is done by having a custom view-model class for the window as shown above, then adding another view-model to it as a public, bindable property called SelectedView.

public class ShellViewModel
{
  …
  private Object _selectedView;

  public Object SelectedView
  {
    get
    {
      return _selectedView;
    }

    set
    {
      if (value == _selectedView)
      {
        return;
      }

      _selectedView = value;
      OnPropertyChanged(nameof(SelectedView));
    }
  }
}

It is preferred that SelectedView be a custom type instead of System.Object. A different view-model is required for each view that the application needs to render. For example, if the application requires tabs for a calories consumed calculator and a speed calculator, then two view-models must be made for each of these tabs. Having a common base class between them ensures type-safety when switching between the two view-models.

A custom renderer is also required for each view. Renderers are typically built on top of the UserControl class. The declarative syntax of XAML makes it very easy to build a user interface with any kind of layout.

The example below shows a SpeedCalculatorView that computes the value of speed based on the time taken and distance covered.

<UserControl …>
  <Grid>
    <Grid.ColumnDefinitions>
      <ColumnDefinition Width="150"/>
      <ColumnDefinition Width="250"/>
    </Grid.ColumnDefinitions>

    <Grid.RowDefinitions>
      <RowDefinition Height="Auto"/>
      <RowDefinition Height="Auto"/>
      <RowDefinition Height="Auto"/>
    </Grid.RowDefinitions>
    <TextBlock Grid.Column="0" Grid.Row="0" Text="Time"/>
    <TextBlock Grid.Column="0" Grid.Row="1" Text="Distance"/>
    <TextBlock Grid.Column="0" Grid.Row="2" Text="Speed"/>

    <TextBox Grid.Column="1" Grid.Row="0" Text="{Binding Time}"/>
    <TextBox Grid.Column="1" Grid.Row="1" Text="{Binding Distance}"/>
    <TextBox Grid.Column="1" Grid.Row="2" Text="{Binding Speed}"/>
  </Grid>
</UserControl>

The window resources contains a DataTemplate declaration to associate the SpeedCalculatorView with the SpeedCalculatorViewModel. The user interface is changed by setting the value of SelectedView in ShellViewModel to an instance of SpeedCalculatorViewModel.

In the next part, I will cover how to add interactivity to this application.